Northumbrian Climbing Guide |
||||||||||
|
|
|
Causey Quarry
1 Wall Route One 6m S
Goes up the middle of the small triangular wall at the left end of the crag, moving right on small holds at the top.
2 Black Crack 7m VD
The short chimney-crack at the right end of the triangular wall.
3 Easy Buttress 7m M
The obvious easy-angled buttress on the right of Black Crack. Step onto the buttress from the right and continue straight up.
4 Spider Crack 7m S
The short crack upon the right of Easy Buttress. Ascend the crack to the more awkward section where it slants right. Follow the crack, then exit left.
5 Wall Route Two 7m HS
Starts just right of Spider Crack
DIRECT FINISH 4c
From the top of the crack go up the wall.
6 Dusky Maiden 9m S
The blunt ar? to the right is climbed on good holds.
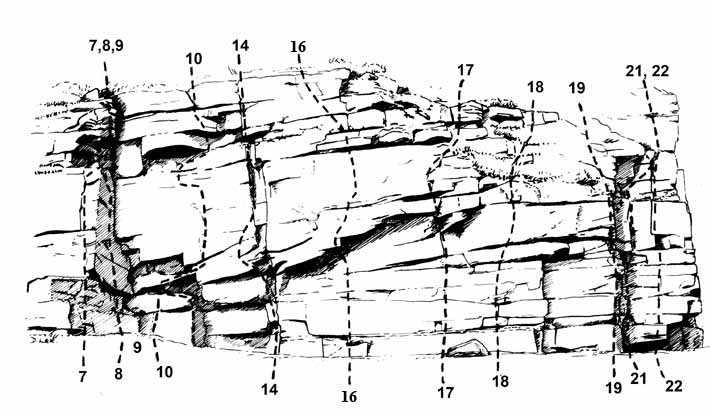
7 Quarry Wall 12m VS 4c
The narrow undercut wall at the right end of the eastern section, just round the corner from the main crag. The first 3 metres are the hardest. Ascend the small overhang to a resting place. Climb the square-cut wall with crack, until bulges force a traverse to the right. After about 1m climb straight over the bulge on good holds
8 Overhanging Wall 17m HVS 5a
The main crag is at a slightly lower level bounded on the left by this overhanging wall at right-angles to it. An awkward mantelshelf leads to a cracked wall which is followed until the cracks peter out. Continue up the overhanging wall on small fingerholds until a crack can be reached on the right. Pull across left to a resting place. Finish up Quarry Wall.
9 Crack and Chimney 17m S
The crack in the right-angle turns into a chimney in its upper reaches. Climb straight up the crack. Above, there are useful holds on the left wall leading to the chimney which is climbed facing left.
10 The Mauler 20m E3 5b
The route goes up the main face starting a 2m right of Crack and Chimney at a short rib. Climb the rib to a ledge just below an overhang. Using hand-holds over the bulge traverse right for about 1m past a small hole to a ledge. Move left and up the wall to below the large overhang. Swing right until it is possible to pull over a break in the bulge. Traverse left to finish.
11 The Mauler Roof 20m E5 6b
Climb the Mauler and finish up the obvious roof.
George Haydon (1980ish)
Unbreakable 18m E6 6c (**new**)
Start about 1.5m left of The Mangler directly under the overhang, Climb over the overhang using any hold left of the crack, a long stretch to a crimp on the left is needed. Cross straight over Mauler Traverse and continue super direct to only runner in line with Mauler Roof. Finish directly up with a dynamic move for the top. A long reach may benefit.
Peter Holder (22 August 2009)
12 The Mauler Direct 20m E5 6b
Climb the wall to meet the roof from the end of the initial traverse right. Finish as for The Mauler
13 The Mauler Direct and Roof 20m E5 6b
Guess!
14 The Mangler 19m HVS 5a
The classic of the crag which takes the obvious overhanging crack splitting the face. The crux is not far above the ground. After the strenuous section continue up the crack to the sentry box keeping to the left. Continue up the crack and pull over the final bulge keeping to the right.
Nev Hannaby (1950ish)
(Originally called Causey Crack)
(Originally called Causey Crack)
15 Perplexity 19m E5 6c
Start 2m right of the Mangler. Climb directly up the wall to the overhang. Climb this direct on small holds and make very hard moves to gain a resting ledge above. Move straight up the wall on small holds.
Paul Linfoot (1 August 1981)
(Paul straightened out the route the following year)
(Paul straightened out the route the following year)
16 The Dangler 19m E3 5c
An excellent route. About 4m right of The Mangler a thin crack splits a horizontal roof. Climb the short wall then surmount the overhang and move left, then up and right, into the groove which is followed to the top.
17 Hangover 9m E1 5b
Takes the thin crack which ends in a block overhang 4m right of The Dangler. Climb the short, awkward wall below the crack. The crack is climbed to the overhang. Surmount this and continue more easily.
18 Letterbox Wall 9m E1 5b
The stained wall 3m right of Hangover. Climb the wall with an awkward move to gain a letterbox at 15m. Continue up the wall finishing straight over the bulge or to the left.
Corner HVS 5a
A dirty climb without much direction. Two metres right of Letter Box Wall is a short corner. Follow this then climb the steep dirty wall above.
19 The Ar? 8m MS
The obvious ar? at the right end of the main face. There is a small tree at the top.
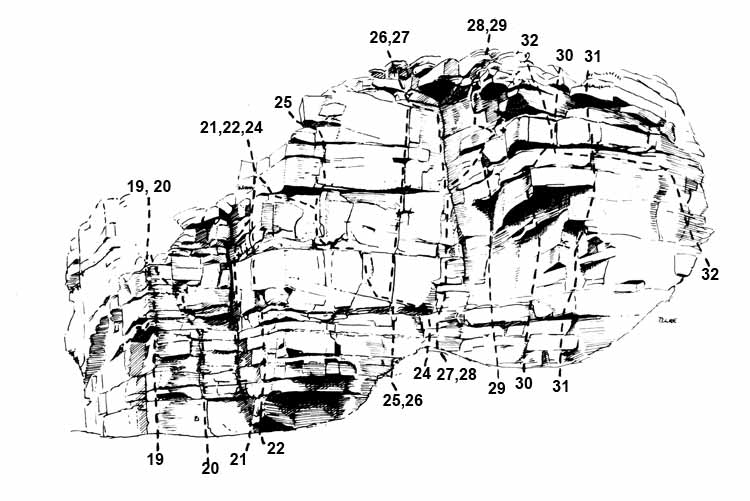
20 Wall Route Three 30m S
The wall round to the right of The Ar? has an irregular crack running up the centre. Climb the crack, moving left and up onto a detached flake. Finish up left via a tree.
21 Hanging Crack 12m MVS 4b
In the corner to the right. Climb the crack (awkward in the middle) until a small ledge is attained. Traverse right and finish up Causey Crack.
VARIATION START 5a
Takes the wall to the right. Mantelshelf onto a ledge and climb the wall on poor holds moving slightly left until better holds lead into Hanging Crack.
22 Causey Crack 12m VS 4c
The steep wall to the right of Hanging Crack. One of the best routes in the quarry. Climb up onto a small ledge at 5m and pull onto a sloping ledge on the right. Pull into a small niche and continue to the top via the crack.
23 A Means To An End 10m VS 4c
Start at the right hand end of the right wall of Hanging Crack where the face is severely undercut. Climb onto a ledge and move right onto the arete, which is followed to the top.
24 Diagonal 25m D
Round the corner from Causey Crack is another corner with a muddy bank reaching part way up. From the top of this bank traverse up and left using the obvious series of ledges.
25 Diagonal Direct 8m HS
Starts just up from an undercut corner, below the start of Diagonal at the bottom of a short wide crack. Climb the crack and the wall above moving right onto Diagonal. Follow this to the finish. At the top move onto a ledge on the right and climb the cracked wall.
26 Telstar Direct 15m MVS 4c
The obvious crack in the wall to the left of the corner is climbed throughout.
Simon Gee, L. Ogle (1980ish)
27 Telstar Crack 18m S
Takes the corner crack from the same start as Diagonal. The crack is climbed to the roof. Make a short, airy hand traverse left to the top.
Nev Hannaby (1950ish)
(Originally called "The Corner", this ascentfinished on the right.)
(Originally called "The Corner", this ascentfinished on the right.)
28 Right Hand Wall 18m VS 4c
Takes the buttress on the right of Telstar Crack. Climb the latter until past the difficult section. Traverse delicately right and up to a small ledge. Pull up and left onto another ledge. Finish strenuously up to the right.
Direct start 4c
Takes the incipient groove directly above 28 on the crag diagram to the start of the rightward traverse by the peg.
29 Right Wall Direct 18 m E1 5c
A direct route up Right Hand Wall. Steep and strenuous with no protection. Start at the foot of the buttress and work left up to the niche. Pull round the overhang and join the ordinary route.
White Taverse 11m VS 4b
An esoteric experience.Start from the top of a block 4m up the left gully wall. Climb up dirty rock until a hand traverse leads left to below the small corner up which Sandman finishes. Climb this moving left.
30 Sandman 14m E3 5c
The large overhanging nose which forms the right edge of Right Hand Wall is ascended by awkward and strenuous moves on suspicious rock. Start at a small recess at the right end of the lowest part of the buttress. Climb to a short corner and up this to a roof. Overcome the roof and climb the left side of the nose to a ledge. Move up, then round the edge to finish, as for The Haunt, onto the block on the right.
Karl Telfer (1970ish)
31 White Light 13m HVS 5b
Start at a crack in the small dip to the right of the previous route. Surmount the first bulge to a recess, then pull out right to a ledge. Up the wall and the crack to beneath the overhang. Make strenuous moves to surmount the overhang.
32 White Traverse 11m MVS 4b
Starts just up from the undercut corner, below the crag on the right. Move up and follow a hand-traverse left to a resting place below a small corner. Climb the corner and move left to the top.
33 Low Level Girdle 80m VS 5b
Either direction possible but left to right normal. Only in one place (Causey Crack area) does the traverse achieve any height above ground level.
34 The Haunt 46m VS 5a
This excellent high-level girdle takes an exposed line across the main part of the crag.
(1) 13m. Climb Quarry Wall up to the final bulges.Traverse right for 4m and step down to gain a good hold which enables a
move round the overhanging rib to be made, across the top of Overhanging Wall intothe upper reaches of Crack and Chimney.
(2) 15m. Move down Crack and Chimney until a delicate move up and right can be made to gain the holds running right beneath the big overhang. Traverse right until below the final bulging section of The Mangler. Move right across the steep wall (strenuous) until the groove of The Dangler can be gained. Continue traversing at the same level more easily along a horizontal hand crack (loose rock) out onto the top.
(3) 9m. Move down to gain the prominent thin tree at the top of The Ar? and climb down that route for about 2m. Traverse right to gain the large hanging ledge. Cross the ledge and traverse right into Causey Crack which is descended until just above the tip of the niche (protection can be arranged high in the crack). Make a hand traverse right to the ar? and step up to the right round the ar? to gain the finish of Diagonal.
(4) 9m. Cross the 1m wide ledge and make an awkward move into Telstar Crack. Traverse delicately out right to gain the obvious small ledge in the middle of the face (exposed) and make an awkward move down for 2m until a small ledge can be gained for footholds (chockstone and good crack for protection). Reach the top of the big block up on the right pull up strenuously to a ledge which leads on to easy ground.
Ed Thompson Jnr (1970ish)
(Solo)
(Solo)
On the opposite side of the stream there is a small outcrop, rarely climbed.
Xenon E1 5b
The obvious arete
Paul Linfoot (1980ish)
Easy Crack VD
The crack left of Xenon