Ratcheugh

Approach

From Alnwick bypass take the B1340, signposted to Alnwick, Denwick & Seahouses. Turn right through Denwick and then right again towards Longhoughton. After a mile, turn right at the cross-roads go past the crag park in a layby opposite the drive to Ratcheugh Folly. Follow the track at the edge of the wood until under folly and then go straight up to the crag. Alternately, from Alnwick take the A1068 signposted to Alnmouth and Ashington for 2 miles until a left turn is taken towards Longhoughton. Plkease inform the tenant at teh folly, who is an very pleasant lady and is quite happy to allow climbing on the crag so long as the culprits identify themselves.

Routes

Most of these descriptions are taken from the guide produced by Ken Smith of the Wanneys Climbing Club. The hand drawn elevation is adapted from the same guide.
The crag is in two sections, separated by a densely overgrown area. Section 1 is to the left, Section 2 is to the right. The normal point of arrival at the crag is beside Narrow Buttress on Section 2.
Sycamore Buttress
This overhanging buttress is at the left end of the crag, about 30 metres left of the folly. The first climb begins below the left hand crack.
1  Hangup 6m VD  
Climb the water stained slab to the weakness in the overhang, move left awkwardly using the deep cracks. Easier climbing leads to the top.
2  Sorbandyguts 6m VS  
Climb the slanting crack and take the overhang direct to a ledge. Finish directly up the rib above via a delicate mantleshelf move.
3  Sidetrack 6m VD  
Move up the easy slab bypassing the overhang on the left. Finish up the wall.
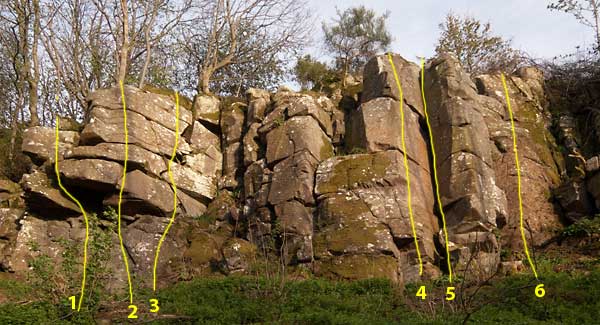
The next obvious feature is Senapod Corner, a distinctive clean cut offwidth corner crack. The first climb is on the wall left of this.
4  Itchypaw 6m HS 4b 
6 metres right of the last climb is a wide clean crack, Senapod Corner, and Itchypaw takes the wall on the left. Climb the wall direct, stepping left into the recess reduces the grade to Difficult.
5  Senapod Corner 6m VS 4c 
The obvious corner crack, which may become very strenuous if the wrong tactics are adopted.
6  Sepia Slab 9m VD  
Starts 3 metres right of Senapod Corner. Move up the blunt corner on small holds trending right via a sloping shelf. Avoid the temptation to place small micro wires in the block beneath the sloping shelf, the block isn't fixed to the crag.
The next routes lie 10 metres beyond a buttress with a giant holly tree growing out of it. There is an easy way down just to the left of the routes.
7  The Doddler 8m MS  
This route is on the detached pinnacle lying 5 metres right of Holly Tree Wall. Ascend the left edge of the pinnacle on large holds.
8  FlueBrush 6m HS  
Starts in the right corner of the pinnacle. Move up the chimney crack and make a strenuous move to finish. Entertaining.
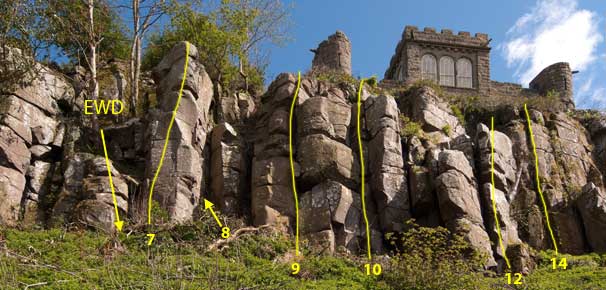
To the right is a vegetated bay with 2 vague chimneys in it, the next 2 routes are on the right of this bay, two parallel grooves.
9  The Diddler 8m D  
The left hand of the two grooves. Move up and over some blocks, then easily to the top.
10  Fern Crack 8m D  
This is the chockstone filled groove/crack on the right. Go straight up past the wedged blocks.
Capstone Buttress
5 metres right is Capstone Buttress, identified by a deep chimney capped by a large chockstone.
11  Capstone Chimney 6m D  
The obvious chimney.
12  Capstone Ar? 8m D  
The stepped ar? to the right of Capstone Chimney.
13  Capstone Face 8m HS  
Starts at the lowest point right of the ar? and takes a direct line to the top.
14  Pushover 9m HVS  
Lying back is a slabby wall with a well defined crack near its left hand side which steepens near the top. The first part is straightforward, but the final moves are testing.
15  Plebian 9m VD  
Set on a large clean buttress several metres to the left of Curving Crack. Climb the two shelves and then trend left up a crack wall. Take care with friable rock near the top.
16  Stormer 9m S  
the right side of the buttress. Move up the easy steps then ascend the wall to a steep finish.
17  Curving Crack 8m VD  
The obvious deep chimney formed by a leaning pinnacle resting against the back wall and giving and old fashioned route of quality. Climb the crack direct or step right near the top and finish up the short wall.
18  Muscleman 7m VS 4c 
The obvious bow-shaped crack gives a very strenuous route. Pull out of the crack to the left or right, both are hard, and finish up the wall above.
19  The Chimney 9m D  
The chimney containing a loose chockstone and situated 3m right of Muscleman.
20  Flippertygibbet 6m HS 4b 
The thin crackline in the wall between Muscleman and Austerity gives an interesting problem. The crack is difficult to start but holds improve at the overhang.
21  Jigsaw VD  
Climb the cracked wall on the left hand side of a high buttress just to the right of the last climb and step right at the overhang. Climb the short wall to the top. Well worth doing.
22  Austerity 9m MVS  
Takes the front of the buttress in a direct line, fingery and poorly protected.
23  Clitheroe's Crack 5m HS  
To the right of the previous route is a pointed pinnacle of rock, and above this a short clean crack formed by an overlapping wall. This crack gives a short strenuous climb.
24  Kidology 9m HS  
About 20 metres right is a deep chimney with a clean cracked wall to it's right (Veterans Wall). On the left of the chimney is a clean narrow slab bounded non the right by a dirty groove. Kidology takes the slab by a series of interesting mantleshelf moves.
Veterans Wall
This is the quite high cracked wall to the right of Kidology and it provides 2 climbs.
25  The Left Edge 9m VD  
Climb the left hand stepped arete making an ungainly move near the top
26  Veterans Way 11m VD  
One of the best climbs of its standard on the crag. Climb the crack in the middle of the wall trending right. Pull over the top to finish.
There is now a vegetated area over which some building rubble was dumped in the 1960s. The next routes are beyond this, in a square bay containing two cracks.
27  Little Mazer 8m VD  
Ascend the left hand crack up the centre of the wall, stepping right past a tree
28  Afterthought 8m D  
The right hand crack is climbed with little trouble
Narrow Buttress
The next prominent feature is a tall narrow buttress. The next route lies left of it.
29  Narrow Buttress Direct 10m VS  
A route of quality. Start at the lowest point beneath the prominent narrow buttress and climb easily to a flat ledge, then move up the front of the buttress using awkward side holds to the top.
30  Cuddystalks 10m D  
The groove on the right of narrow buttress. Ascend the groove past some tree stumps.
  Variation finish (VS)   
Step left steeply near the top and finish up the wall.
31  Rabbits Way 10m VD  
Takes the V groove right of the last climb. Move up the groove to a good ledge then bear left and straight up.
Adams Buttress
Several metres to the right is an obvious deep chimney formed by a large section of rock resting against the hillside. This is Adams Buttress and it contains 3 excellent routes.
32  Adams Chimney 10m VD  
The left hand chimney
33  Adams Folly 10m S  
A little classic. Start to the right of the chimney at the lowest point of the face beside a small rock step. Move up on small holds for about 5 metres until it is possible to step leftwards onto the arete (crux). Continue more easily to the top.
34  Sheer Folly 10m MVS  
Start as for Adams Folly, but instead of moving for the left edge trend right to reach a broken crack. Follow this via a loose hold to the top.
The next clean buttress has an overhung arete on the left hand side
35  Girlfriend In A Coma 10m E5 6a 
Start to the right of the lowest point of the face and climb the wall direct on sloping holds.
Ash Tree Slabs are the slabs with a Sycamore and a large Cherry tree growing out of them and set back from the main crag, with two cracks on the right hand side.
36  Ash Tree Slabs Route 1 8m D  
The left hand crack, partly obstructed by the Cherry tree.
37  Ash Tree Slabs Route 2 8m D  
The right hand crack
A massive rotten tree stump lies at the foot of the crag to the right of Ash Tree Slabs with a clean featureless slab rising behind it. A broken crack runs up the left hand side and gives a worthwhile route.
38  Oaky Balks 12m VD  
Climb the groove and gain access to the crack, which is followed to the top
39  Flash Harry 12m MS  
Up the short awkward wall left of the stump. Climb the slab near its left edge until it steepens, then move right and ascend the short wall
40  Woodworm 8m VD  
An obvious line up a square cut recess in the corner, with a corner crack leading out of it. Easily up to the roof of the recess, and then escape steeply via some good holds.
41  Cannonade 9m VD  
A couple of metres to the right is a distinctive chimney with hanging chockstones near the top. Climb the chimney direct to reach good finishing holds.
42  Flying Mac 9m VD  
Just to the right of Cannonade is a fine wall with a system of broken cracks running up the left hand side. Move up the v-groove until better holds are gained in the crack. Mantleshelf to finish.
43  Delicado 9m HS  
Not an obvious line, but well worth doing. takes the left edge of the wall to the right of the last climb. Pull up on small holds until the slab steepens, then step right using a horizontal crack. Mantleshelf to finish.
44  Buckthorn 10m D  
A square groove to the right of the blank wall is climbed on good holds until it is possible to step left onto Delicado.
45  Crowdie 10m D  
Ascend the easy angled wall just right of Buckthorn. Finish awkwardly over bulging blocks.