Hunterheugh Crag

Approach

Turn east at the Glanton/Bolton crossroads on the A697 and go straight on for 4.5 miles to roadside parking at East Bolton farm. Take the footpath over the cattle grid and follow the track round the edge of two fields and at the bottom of the hill go straight on across a bridge over Titlington Burn. Follow the track up to the col where it swings right down towards Kimmer Lough. Go straight up the hill on the left across the rocks to a hurdle on the fence. Trend diagonally right across the heather for a couple of hundred metres, crossing a track, until you drop down onto a flat moss with the crag visible on the left. Follow the edge of this moss to the crag - a path soon appears.

Routes

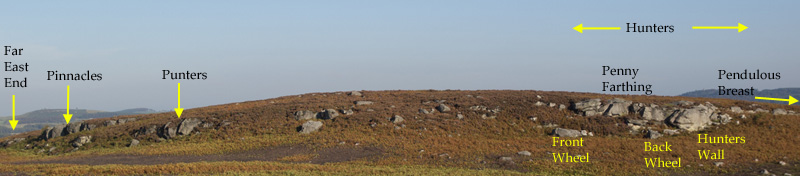
The crag is described from left to right. There are two sections separated by several hundred metres. Starting from the left there are a couple of easy slabs before reaching The Pinnacles area - a couple of fine five metre high blocks followed by a bulging wall which tails off into easier and lower territory. A hundred metres right of The Pinnacles is the Punters section, with half a dozen nice easyish problems.

The right hand section consists of a low discontinuous wall with a couple of boulders underneath, then a fine clean vertical wall, Hunters Wall, bounded by a neb on the left. A prominent feature of Hunters is the collection of ironstone nodules sticking out of it. None of these have snapped off yet...

Another couple of hundred metres right is a prominent outcrop in the shape of a pendulous breast.

An indistinct path can be followed along the bottom of the crag from the Pinnacles area to Hunters, which is useful when the bracken is in full swing.
Far East End
1  The Slab LH 4     The left side of the slab avoiding the left edge.
2  The Slab RH 4     Start at the centre and trend right to the highest point.
3  Gundog 4+     The tricky little wall 8 metres right with a crack in the top right.
The Pinnacles
At the first pinnacle there is a heathery ramp leading up to the problems.
4  Pinnacle Slab 4     Just left of the 1st Pinnacle, an easy slab to a slopey mantel
First Pinnacle
The front of this sits above an unhealthy drop if you bounce badly.
5  bobs Front Face Ungraded     Standing start & sitting start both done I think. Start low on the left then move right and up to a scary finish.
6  Bobs - right arete Ungraded  
7  Off The Scent 4     The slab on the RH side of the pinnacle, starting at the blocks and finishing left on good holds
Second Pinnacle
8  bobs 2nd pinnacle slab Ungraded     Follow the line of finger-slicing holes finishing on the left.
9  Bobs 2nd pinnacle slab, RH side Ungraded  
10  bobs jump to hold (no adj grade)  
The LH side of the front face of the pinnacle, starts with lurch up to sharp edge.
11  Bobs Red wall Ungraded     The centre of the front face of the pinnacle, just left of the red stained section.
12  Hot Bitches 4+     Starting on the LH block, over the quartz vein.
13  Brace of Veins 4+     A bit further right, straight over the two quartz veins
14  Pointless 3+     The right arête of the pinnacle.
Quartz Buttress
The bulging mineralised wall right of the gully. There is an undercut crack on the left, followed by three sets of flakes on the headwall, then a groove and a couple of problems at the RH end. The continuation is an easier wall with a few problems.
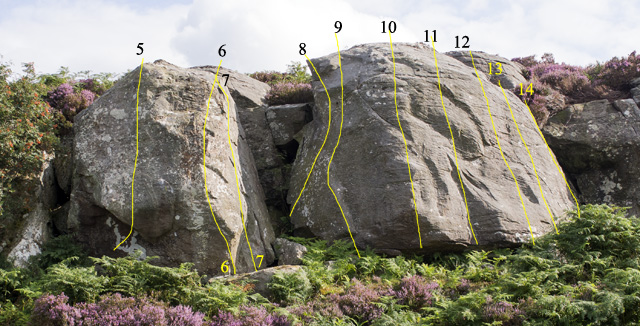
15  The Mounting Block 5     SS to the crack, udging to the left a bit.
16  Bobs 1 Ungraded     Start under the LH flakes, straight up just right of the flakes.
17  Bobs 2 ungraded. Ungraded  **   The central set of flakes from a SS just left of the groove.
18  Top Hound 5  ***   A superb problem at it's grade. SS under the groove and straight up over the flake above to an interesting finish.
19  The Runnels 4     Up the runnels and the short wall above.
20  Saboteur 4+     The slabby left wall of the corner.
21  Arete 4+     The arête forming the LH side of the crack.
22  The Crack 3     The obvious crack right of the corner
23  The Snout 4+     The rounded nose to the right of the crack from an awkward sit start.
24  Point to Point 5  ***   A cracking R to L traverse. Start on the low quartz wall at the extreme right and traverse left, under the Snout and keeping low across the Crack and the heathery corner onto the bottom of the Saboteur slab. Move awkwardly left round the corner, cross The Runnels and finish up Top Hound
Punters
A few small buttresses poking out of the heather with half a dozen quite good easy problems.
25  Punters Nose 4+     The neb, no cheating by using the block on the right.
26  Punters Arête (LH) 4+     SS finishing just left of the arête.
27  Punters Arête (RH) 4     SS under the arête, moving right
The next 3 problems lie on the right hand buttress
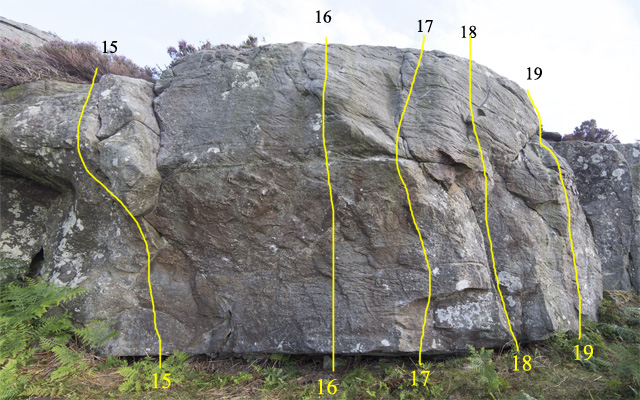
28  The Ban 4     The green left hand wall
29  Tally Ho 4     The grooved centre of the buttress..
30  Yoiks 4     The LH edge of the wall.
Hunters
This is the main part of the Western end of the crag. It consists a two boulders below a scrappy looking buttress set back above a grassy shelf, then a fine lower section of clean rock.
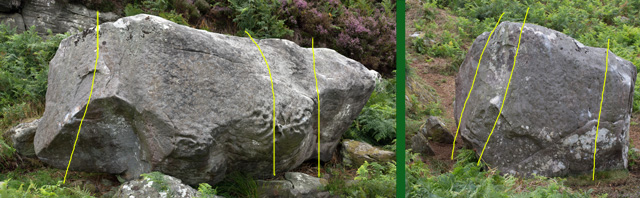
Front Wheel Boulder
The left hand of the two boulders.
31  Bobs traverse Ungraded  
32  Bobs Ungraded     An awkward SS to the front of the boulder.
33  Bobs Small Pock Holes Ungraded  
34  Bobs Big Pock Holes Ungraded  
Back Wheel Boulder
35  Bobs round the back Ungraded  
36  Bobs boulder LH Ungraded  
37  Bobs boulder RH Ungraded  
Penny Farthing Wall
The clean wall on the LH side of the upper tier has 3 problems. There is an unexplained small carving low down behind the tree at the right hand end.
38  Sticky Paws 3+     Pad up the left facing narrow slab, not using the arêtes.
39  Honest Hound 4+     SS below the diagonal arête, follow the line of the arête..
40  Covert Crimp 5     Crimp up the highest bit of the wall, just left of the tree.
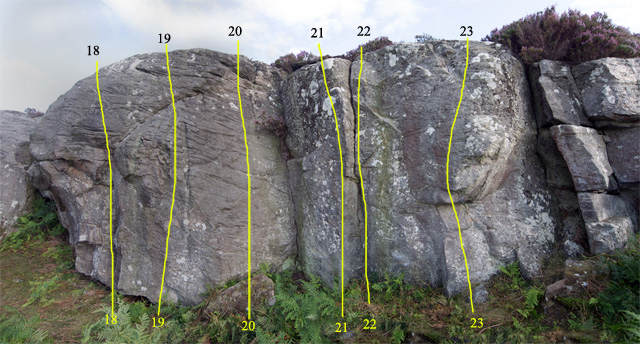
The next three problems are above a shelf and difficult to protect with mats.
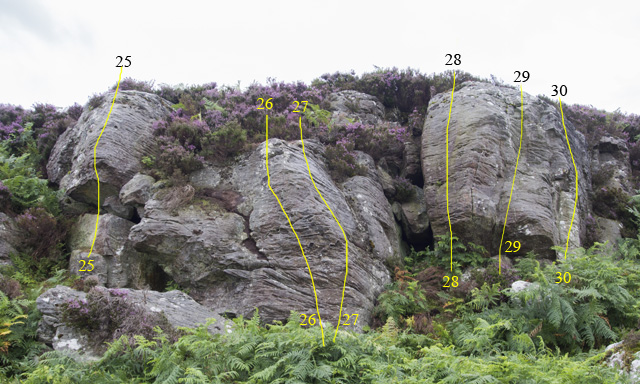
41  The Punchbowl 3  ***   The arete is a very fine easy problem with a satisfying finish.
42  Runt 3+     The alcove just right of the arête.
43  The Cub 3+     The right hand end of the wall.
Hunters Wall
The lollapalooza is the fine wall bounded on the left by a blunt nose. The wall itself is as clean as a whistle and features several large ironstone protuberances, one in particular looking decidedly dodgy.
44  bobs Ungraded     The nose from a sit start.
45  Hunters Crack 4+     The undercut crack and slab from a sit start.
46  Bobs LH shoulder Ungraded  
47  Bobs Large protruberance (ho ho) Ungraded  
48  Bobs letterbox Ungraded  
49  Bobs Flakes Ungraded  
50  Bobs sharp crimp Ungraded     Starting behind the block
51  Rat Catcher 3+     The flakes at the right hand end of the wall, start at the same place as Bobs Flakes and trend right to finish on the RH flake crack.
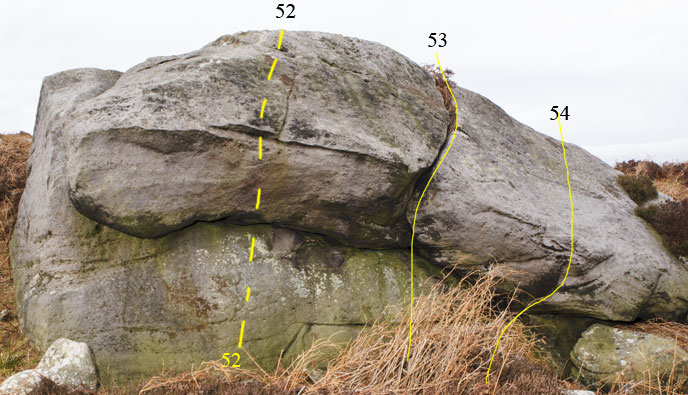
The Pendulous Breast
The final section is a hundred metres further on, easily identified by it's appearance as you approach.
52  Project Ungraded     Mantel the left hand end of the overhang, under the seam.
53  Pendulous Crack 3     Easily up the crack to the right of the overhang.
54  Pendulous Slab 4+     SS on the block under the crack, feet on the small crack low down to the right.